Deployment of the Wallarm node Docker image to GCP
This quick guide provides the steps to deploy the Docker image of the NGINX-based Wallarm node to the Google Cloud Platform using the component Google Compute Engine (GCE).
The instructions limitations
These instructions do not cover the configuration of load balancing and node autoscaling. If setting up these components yourself, we recommend that you read the appropriate GCP documentation.
Requirements
-
Active GCP account
-
Compute Engine API enabled
-
Access to the account with the Administrator or Deploy role and two‑factor authentication disabled in Wallarm Console for the EU Cloud or US Cloud
Options for the Wallarm node Docker container configuration
The filtering node configuration parameters should be passed to the deployed Docker container in one of the following ways:
-
In the environment variables. This option allows for the configuration of only basic filtering node parameters. Most directives cannot be configured through environment variables.
-
In the mounted configuration file. This option allows full filtering node configuration via any directives. With this configuration method, environment variables with the filtering node and Wallarm Cloud connection settings are also passed to the container.
Deploying the Wallarm node Docker container configured through environment variables
To deploy the containerized Wallarm filtering node configured only through environment variables, you can use the GCP Console or gcloud CLI. In these instructions, gcloud CLI is used.
-
Set local environment variables with email and password used for authentication in the Wallarm Cloud:
<DEPLOY_USER>: email to the Deploy or Administrator user account in Wallarm Console.<DEPLOY_PASSWORD>: password to the Deploy or Administrator user account in Wallarm Console.
-
Create the instance with the running Docker container by using the
gcloud compute instances create-with-containercommand:gcloud compute instances create-with-container <INSTANCE_NAME> \ --zone <DEPLOYMENT_ZONE> \ --tags http-server \ --container-env DEPLOY_USER=${DEPLOY_USER} \ --container-env DEPLOY_PASSWORD=${DEPLOY_PASSWORD} \ --container-env NGINX_BACKEND=<HOST_TO_PROTECT_WITH_WALLARM> --container-image registry-1.docker.io/wallarm/node:2.18.1-5gcloud compute instances create-with-container <INSTANCE_NAME> \ --zone <DEPLOYMENT_ZONE> \ --tags http-server \ --container-env DEPLOY_USER=${DEPLOY_USER} \ --container-env DEPLOY_PASSWORD=${DEPLOY_PASSWORD} \ --container-env NGINX_BACKEND=<HOST_TO_PROTECT_WITH_WALLARM> \ --container-env WALLARM_API_HOST=us1.api.wallarm.com \ --container-image registry-1.docker.io/wallarm/node:2.18.1-5<INSTANCE_NAME>: name of the instance, for example:wallarm-node.--zone: zone that will host the instance.--tags: instance tags. Tags are used to configure the availability of the instance for other resources. In the present case, the taghttp-serveropening port 80 is assigned to the instance.--container-image: link to the Docker image of the filtering node.-
--container-env: environment variables with the filtering node configuration (available variables are listed in the table below). Please note that it is not recommended to pass the values ofDEPLOY_USERandDEPLOY_PASSWORDexplicitly.Environment variable Description Required DEPLOY_USEREmail to the Deploy or Administrator user account in Wallarm Console. Yes DEPLOY_PASSWORDPassword to the Deploy or Administrator user account in Wallarm Console. Yes NGINX_BACKENDDomain or IP address of the resource to protect with the Wallarm solution. Yes WALLARM_API_HOSTWallarm API server: us1.api.wallarm.comfor the US Cloudapi.wallarm.comfor the EU Cloud
api.wallarm.com.No WALLARM_MODENode mode: blockto block malicious requestsmonitoringto analyze but not block requestsoffto disable traffic analyzing and processing
monitoring.No TARANTOOL_MEMORY_GBAmount of memory allocated to Tarantool. The value can be an integer or a float (a dot .is a decimal separator). By default: 0.2 gygabytes.No WALLARM_ACL_ENABLEEnables the IP blocking functionality with default settings. The following values can be assigned to a variable: trueto enable the IP blocking functionalityfalseto disable the IP blocking functionality
false.
To enable the IP blocking functionality with custom settings, you need to define appropriate NGINX directives and run the container mounting the configuration file with defined directives.Values
on/enabled/ok/yesSince version 2.16.0-8 of the filtering node image, the values
on/enabled/ok/yesassigned to this variable disable the IP blocking functionality. We recommend deploying the latest image version as described in the current document and passing the valuetrueorfalsein this variable.No DEPLOY_FORCEReplaces an existing Wallarm node with a new one if an existing Wallarm node name matches the identifier of the container you are running. The following values can be assigned to a variable: trueto replace the filtering nodefalseto disable the replacement of the filtering node
false.
The Wallarm node name always matches the identifier of the container you are running. Filtering node replacement is helpful if the Docker container identifiers in your environment are static and you are trying to run another Docker container with the filtering node (for example, a container with a new version of the image). If in this case the variable value isfalse, the filtering node creation process will fail.No -
All parameters of the
gcloud compute instances create-with-containercommand are described in the GCP documentation.
-
Open the GCP Console → Compute Engine → VM instances and ensure the instance is displayed in the list.
Deploying the Wallarm node Docker container configured through the mounted file
To deploy the containerized Wallarm filtering node configured through environment variables and mounted file, you should create the instance, locate the filtering node configuration file in this instance file system and run the Docker container in this instance. You can perform these steps via the GCP Console or gcloud CLI. In these instructions, gcloud CLI is used.
-
Create the instace based on any operating system image from the Compute Engine registry by using the
gcloud compute instances createcomand:gcloud compute instances create <INSTANCE_NAME> \ --image <PUBLIC_IMAGE_NAME> \ --zone <DEPLOYMENT_ZONE> \ --tags http-server<INSTANCE_NAME>: name of the instance.--image: name of the operating system image from the Compute Engine registry. The created instance will be based on this image and will be used to run the Docker container later. If this parameter is omitted, the instance will be based on the Debian 10 image.--zone: zone that will host the instance.--tags: instance tags. Tags are used to configure the availability of the instance for other resources. In the present case, the taghttp-serveropening port 80 is assigned to the instance.- All parameters of the
gcloud compute instances createcommand are described in the GCP documentation.
-
Open the GCP Console → Compute Engine → VM instances and ensure the instance is displayed in the list and is in the RUNNING status.
-
Connect to the instance via SSH following the GCP instructions.
-
Install the Docker packages in the instance following the instrauctions for an appropriate operating system.
-
Set instance environment variables with email and password used for authentication in the Wallarm Cloud:
<DEPLOY_USER>: email to the Deploy or Administrator user account in Wallarm Console.<DEPLOY_PASSWORD>: password to the Deploy or Administrator user account in Wallarm Console.
-
In the instance, create the directory with the file
defaultcontaining the filtering node configuration (for example, the directory can be named asconfigs). An example of the file with minimal settings:server { listen 80 default_server; listen [::]:80 default_server ipv6only=on; #listen 443 ssl; server_name localhost; #ssl_certificate cert.pem; #ssl_certificate_key cert.key; root /usr/share/nginx/html; index index.html index.htm; wallarm_mode monitoring; # wallarm_instance 1; # wallarm_acl default; location / { proxy_pass http://example.com; include proxy_params; } }Set of filtering node directives that can be specified in the configuration file →
-
Run the Wallarm node Docker container by using the
docker runcommand with passed environment variables and mounted configuration file:<INSTANCE_PATH_TO_CONFIG>: path to the configuration file created in the previous step. For example,configs.-
<DIRECTORY_FOR_MOUNTING>: directory of the container to mount the configuration file to. Configuration files can be mounted to the following container directories used by NGINX:/etc/nginx/conf.d— common settings/etc/nginx/sites-enabled— virtual host settings/var/www/html— static files
The filtering node directives should be described in the
/etc/nginx/sites-enabled/defaultfile. -
-p: port the filtering node listens to. The value should be the same as the instance port. -
-e: environment variables with the filtering node configuration (available variables are listed in the table below). Please note that it is not recommended to pass the values ofDEPLOY_USERandDEPLOY_PASSWORDexplicitly.Environment variable Description Required DEPLOY_USEREmail to the Deploy or Administrator user account in Wallarm Console. Yes DEPLOY_PASSWORDPassword to the Deploy or Administrator user account in Wallarm Console. Yes WALLARM_API_HOSTWallarm API server: us1.api.wallarm.comfor the US Cloudapi.wallarm.comfor the EU Cloud
api.wallarm.com.No DEPLOY_FORCEReplaces an existing Wallarm node with a new one if an existing Wallarm node name matches the identifier of the container you are running. The following values can be assigned to a variable: trueto replace the filtering nodefalseto disable the replacement of the filtering node
false.
The Wallarm node name always matches the identifier of the container you are running. Filtering node replacement is helpful if the Docker container identifiers in your environment are static and you are trying to run another Docker container with the filtering node (for example, a container with a new version of the image). If in this case the variable value isfalse, the filtering node creation process will fail.No
Testing the filtering node operation
-
Open the GCP Console → Compute Engine → VM instances and copy the instance IP address from the External IP column.
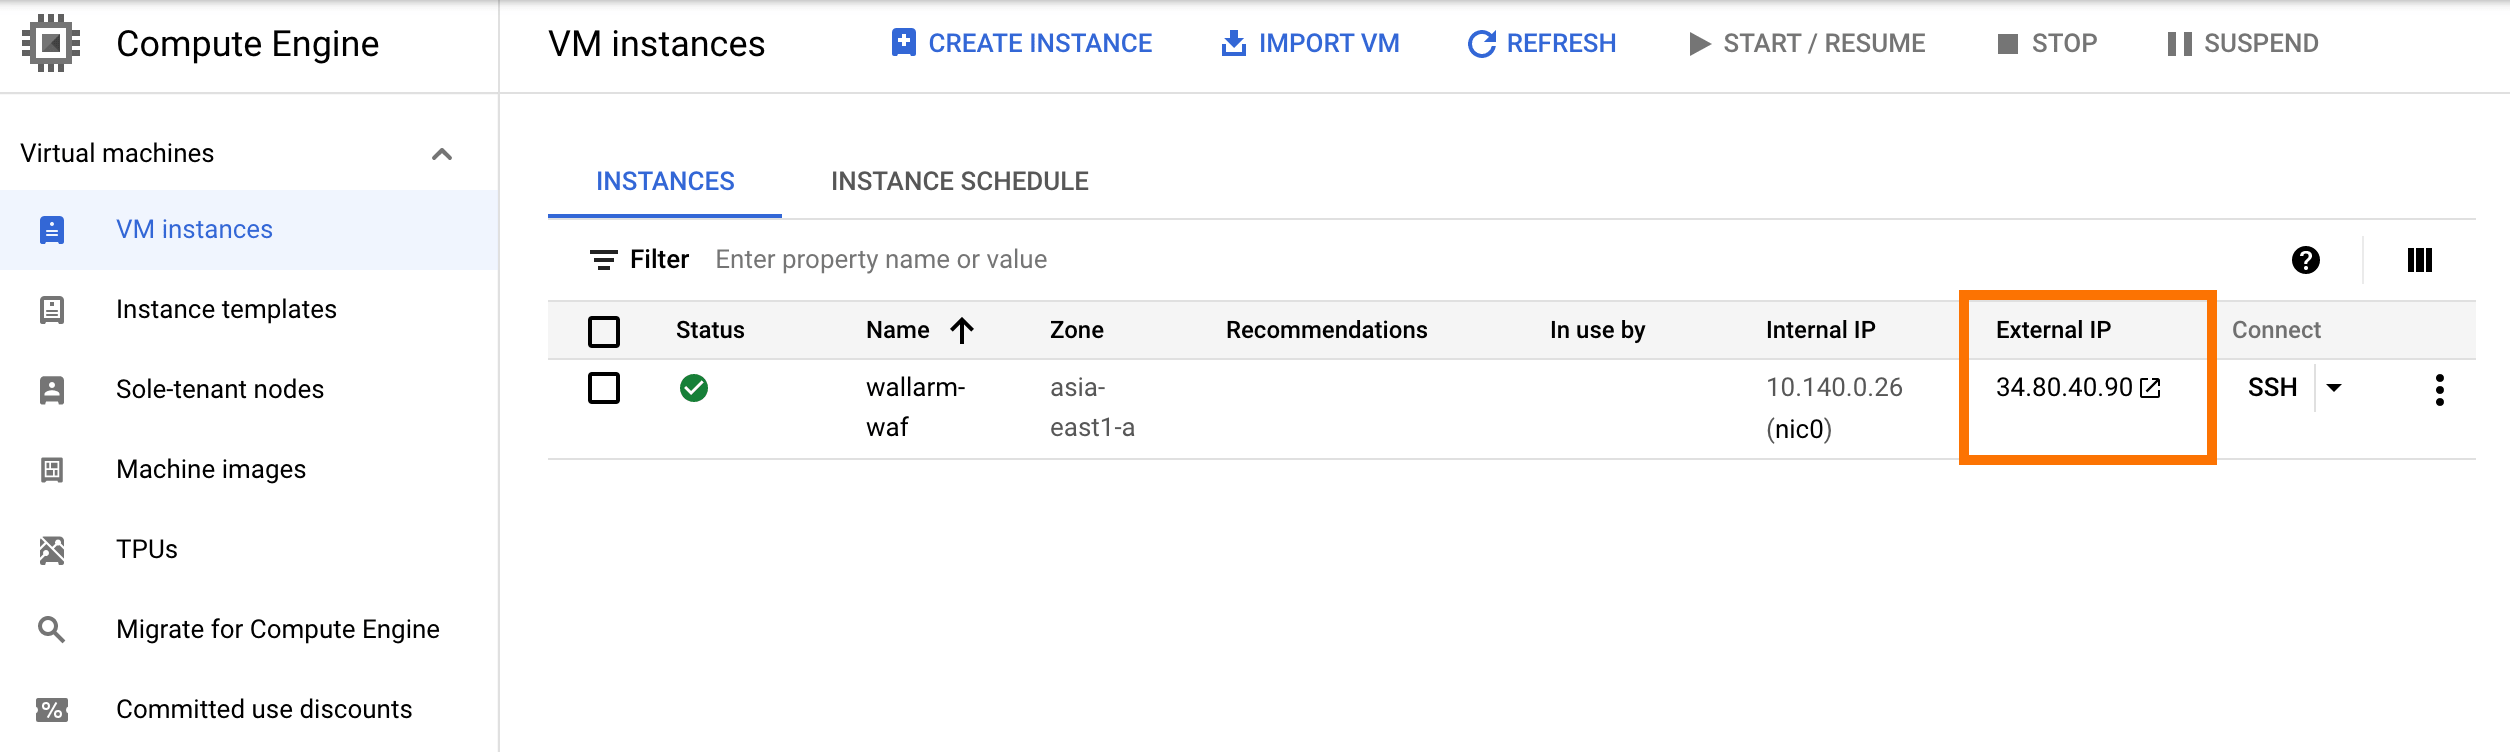
If the IP address is empty, please ensure the instance is in the RUNNING status.
-
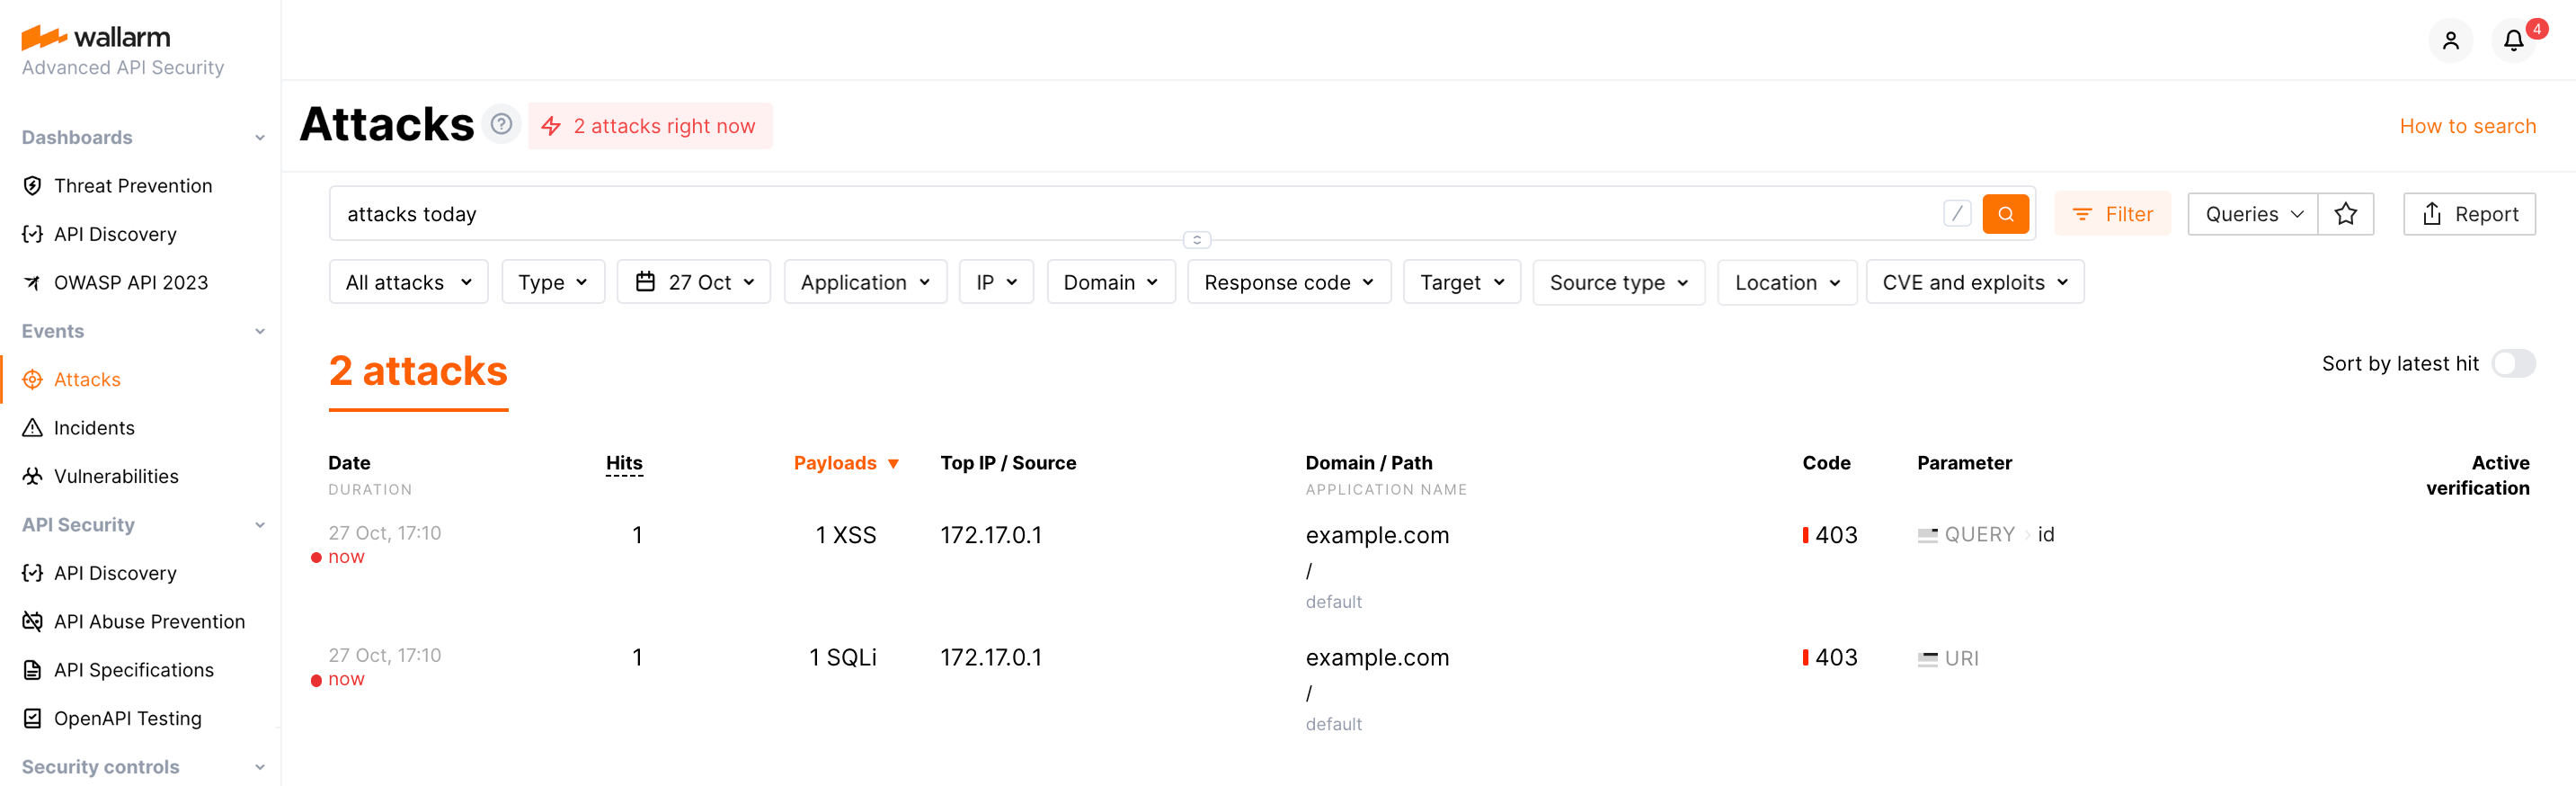
Send the request with test SQLI and XSS attacks to the copied address:
-
Open the Wallarm Console → Events section in the EU Cloud or US Cloud and ensure attacks are displayed in the list.
Details on errors that occurred during the container deployment are displayed in the View logs instance menu. If the instance is unavailable, please ensure required filtering node parameters with correct values are passed to the container.